1. 服务定义
echo '{
    "service": {
        "name": "web",
        "tags": [
            "java"
        ],
        "port": 8080,
        "check": {
            "args": [
                "curl",
                "-s",
                "localhost:9000/health"
            ],
            "interval": "10s",
            "status": "passing"
        }
    }
}' > /server/data/consul/web.json
服务定义配置文件含义
id服务ID,没有的话j就是namename服务名tags服务的tag自定义可以根据这个tag来区分同一个服务名的服务address服务注册到consul的IP服务发现发现的就是这个IPport服务注册consul的PORT发现的就是这个PORTenable_tag_override标签是否允许覆盖- check 健康检查部分
deregisterCriticalServiceAfterargs指定健康检查的命令interval健康检查间隔时间每隔10s调用一次
更多配置项查看官方文档 https://www.consul.io/docs/discovery/services
1. 通过配置目录
echo '{
    "service": {
        "id": "web1",
        "name": "web",
        "tags": [
            "java"
        ],
        "port": 9000,
        "check": {
            "http": "http://localhost:9000/health",
            "interval": "10s",
            "status": "passing"
        }
    }
}' > /server/data/consul/web.json

$ consul reload
Configuration reload triggered
2. 通过命令行
$ consul services register /server/tmp/web.json
Registered service: web
$ consul services deregister /server/tmp/web.json
Deregistered service: web1
3. /agent
Consul提供了2种HTTP API,/agent/**和`/catalog/**,/agent仅能访问本地的Agent。不建议使用/agent使用来注册于agent相关的实体
In the context of Consul, external services run on nodes where you cannot run a local Consul agent. These nodes might be inside your infrastructure (e.g. a mainframe, virtual appliance, or unsupported platform) or outside of it (e.g. a SaaS platform).
Because external services by definition don’t have a local Consul agent, you can’t register them with that agent or use it for health checking. Instead, you must register them directly with the catalog using the
/catalog/registerendpoint. In contrast to service registration where the object context for the endpoint is a service, the object context for the catalog endpoint is the node. In other words, using the/catalog/registerendpoint registers an entire node, while the/agent/service/registerendpoint registers individual services in the context of a node.https://learn.hashicorp.com/tutorials/consul/service-registration-external-services?in=consul/developer-discovery
consul会不断地将单个节点的状态与全局目录中的一个节点重新对齐。当这种情况发生时,使用/catalog端点注册的服务将消失。
While the
/catalogendpoint seems to offer a valid alternative to the/agentone when it comes to register services and checks it is not recommended to use it to register agent related entities. The reason behind this is that, thanks to the anti-entropy mechanism Consul will constantly re-align the state of the single nodes with the one of the global catalog. When this happens services that were registered using the/catalogendpoint will disappear. The/catalogendpoint is the recommended way to register external services because in that case we will register the service as belonging to anexternal-node.https://learn.hashicorp.com/tutorials/consul/service-registration-health-checks?in=consul/developer-discovery
- 注册
curl -X PUT \
  http://127.0.0.1:8500/v1/agent/service/register \
  -H 'content-type: application/json' \
  -d '{
    "name": "web",
    "tags": [
        "java"
    ],
    "port": 8080,
    "check": {
        "args": [
            "curl",
            "-s",
            "localhost:9000/health"
        ],
        "interval": "10s",
        "status": "passing"
    }
}'
- 注销某个服务实例
curl -X PUT \
  http://127.0.0.1:8500/v1/agent/service/deregister/web1 \
  -H 'content-type: application/json'
- 查看服务列表
$curl http://localhost:8500/v1/agent/services
{
    "redis1": {
        "ID": "redis1",
        "Service": "redis",
        "Tags": [],
        "Meta": {},
        "Port": 6379,
        "Address": "",
        "Weights": {
            "Passing": 1,
            "Warning": 1
        },
        "EnableTagOverride": false,
        "Datacenter": "dc1"
    },
    "web1": {
        "ID": "web1",
        "Service": "web",
        "Tags": [
            "java"
        ],
        "Meta": {},
        "Port": 8080,
        "Address": "",
        "Weights": {
            "Passing": 1,
            "Warning": 1
        },
        "EnableTagOverride": false,
        "Datacenter": "dc1"
    }
}
- 只查询web的服务
$ curl http://localhost:8500/v1/agent/services?filter=Service==web
{
    "web1": {
        "ID": "web1",
        "Service": "web",
        "Tags": [
            "java"
        ],
        "Meta": {},
        "Port": 8080,
        "Address": "",
        "Weights": {
            "Passing": 1,
            "Warning": 1
        },
        "EnableTagOverride": false,
        "Datacenter": "dc1"
    }
}
- 查询除web外的服务
# curl http://localhost:8500/v1/agent/services?filter=Service!=web
{
    "redis1": {
        "ID": "redis1",
        "Service": "redis",
        "Tags": [],
        "Meta": {},
        "Port": 6379,
        "Address": "",
        "Weights": {
            "Passing": 1,
            "Warning": 1
        },
        "EnableTagOverride": false,
        "Datacenter": "dc1"
    }
}
- 查看某个服务实例
$ curl http://localhost:8500/v1/agent/service/web1
{
    "ID": "web1",
    "Service": "web",
    "Tags": [
        "java"
    ],
    "Meta": {},
    "Port": 8080,
    "Address": "",
    "Weights": {
        "Passing": 1,
        "Warning": 1
    },
    "EnableTagOverride": false,
    "ContentHash": "bc9ded7c7f01b119",
    "Datacenter": "dc1"
}
- 查看服务健康状态
# curl http://localhost:8500/v1/agent/health/service/name/web
[
    {
        "AggregatedStatus": "passing",
        "Service": {
            "ID": "web1",
            "Service": "web",
            "Tags": [
                "java"
            ],
            "Meta": {},
            "Port": 8080,
            "Address": "",
            "Weights": {
                "Passing": 1,
                "Warning": 1
            },
            "EnableTagOverride": false,
            "Datacenter": "dc1"
        },
        "Checks": [
            {
                "Node": "VM-0-17-centos",
                "CheckID": "service:web1",
                "Name": "Service 'web' check",
                "Status": "passing",
                "Notes": "",
                "Output": "",
                "ServiceID": "web1",
                "ServiceName": "web",
                "ServiceTags": [
                    "java"
                ],
                "Type": "",
                "Definition": {
                    "Interval": "0s",
                    "Timeout": "0s",
                    "DeregisterCriticalServiceAfter": "0s",
                    "HTTP": "",
                    "Header": null,
                    "Method": "",
                    "Body": "",
                    "TLSSkipVerify": false,
                    "TCP": ""
                },
                "CreateIndex": 0,
                "ModifyIndex": 0
            }
        ]
    }
]
使用?format=text可以获得简单的文本结果
$ curl http://localhost:8500/v1/agent/health/service/name/web?format=text
passing
也可以只查某一个服务实例的健康状态
$ curl http://localhost:8500/v1/agent/health/service/id/web1
4. /catalog
/catlog的参数与/agent不同,一个完整的参数示例如下
{
  "Datacenter": "dc1",
  "ID": "40e4a748-2192-161a-0510-9bf59fe950b5",
  "Node": "foobar",
  "Address": "192.168.10.10",
  "TaggedAddresses": {
    "lan": "192.168.10.10",
    "wan": "10.0.10.10"
  },
  "NodeMeta": {
    "somekey": "somevalue"
  },
  "Service": {
    "ID": "redis1",
    "Service": "redis",
    "Tags": ["primary", "v1"],
    "Address": "127.0.0.1",
    "TaggedAddresses": {
      "lan": {
        "address": "127.0.0.1",
        "port": 8000
      },
      "wan": {
        "address": "198.18.0.1",
        "port": 80
      }
    },
    "Meta": {
      "redis_version": "4.0"
    },
    "Port": 8000,
    "Namespace": "default"
  },
  "Check": {
    "Node": "foobar",
    "CheckID": "service:redis1",
    "Name": "Redis health check",
    "Notes": "Script based health check",
    "Status": "passing",
    "ServiceID": "redis1",
    "Definition": {
      "TCP": "localhost:8888",
      "Interval": "5s",
      "Timeout": "1s",
      "DeregisterCriticalServiceAfter": "30s"
    },
    "Namespace": "default"
  },
  "SkipNodeUpdate": false
}
- ID:36位的UUID字符串
- Node:必填项,节点ID
- Address:必填项,注册地址
- Datacenter:DC
- NodeMeta :KV元数据
- Service:注册的服务
- ID:服务ID,如果没有,使用Service作为服务ID
- Service:服务名称
- Check:注册健康检查,仅支持TCP和HTTP检查
$ curl -X PUT \
  http://127.0.0.1:8500/v1/catalog/register \
  -H 'content-type: application/json' \
  -d '{
  "Node": "VM-0-17-centos",
  "Address": "127.0.0.1",
  "Service": {
    "ID": "web1",
    "Service": "web",
    "Tags": ["java"],
    "Address": "127.0.0.1",
    "Port": 9000
  },
  "Check": {
    "Node": "VM-0-17-centos",
    "CheckID": "service:web1",
    "Name": "Web health check",
    "Notes": "Script based health check",
    "Status": "passing",
    "ServiceID": "web1",
    "Definition": {
      "Http": "http://localhost:9000/health",
      "Interval": "5s",
      "Timeout": "1s",
      "DeregisterCriticalServiceAfter": "30s"
    }
  }
}'
通过这种方式注册的服务,过几秒就被自动删除了
consul会不断地将单个节点的状态与全局目录中的一个节点重新对齐。当这种情况发生时,使用/catalog端点注册的服务将消失。
While the
/catalogendpoint seems to offer a valid alternative to the/agentone when it comes to register services and checks it is not recommended to use it to register agent related entities. The reason behind this is that, thanks to the anti-entropy mechanism Consul will constantly re-align the state of the single nodes with the one of the global catalog. When this happens services that were registered using the/catalogendpoint will disappear. The/catalogendpoint is the recommended way to register external services because in that case we will register the service as belonging to anexternal-node.https://learn.hashicorp.com/tutorials/consul/service-registration-health-checks?in=consul/developer-discovery
5. 部署模型
网上找的部署模型
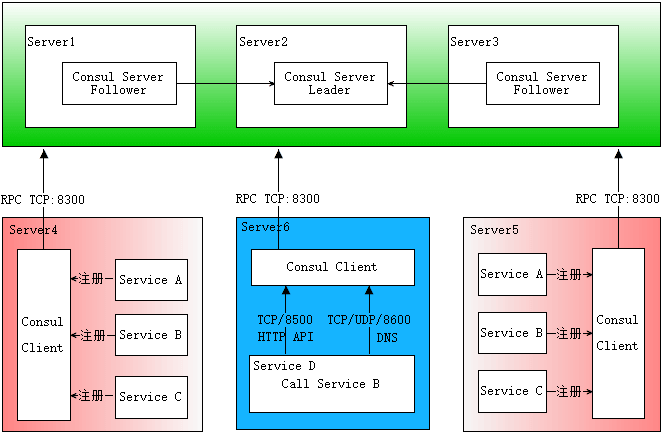
首先需要有一个正常的Consul集群,有Server,有Leader。这里在服务器Server1、Server2、Server3上分别部署了Consul Server,假设他们选举了Server2上的Consul Server节点为Leader。这些服务器上最好只部署Consul程序,以尽量维护Consul Server的稳定。
然后在服务器Server4和Server5上通过Consul Client分别注册Service A、B、C,这里每个Service分别部署在了两个服务器上,这样可以避免Service的单点问题。服务注册到Consul可以通过HTTP API(8500端口)的方式,也可以通过Consul配置文件的方式。Consul Client可以认为是无状态的,它将注册信息通过RPC转发到Consul Server,服务信息保存在Server的各个节点中,并且通过Raft实现了强一致性。
最后在服务器Server6中Program D需要访问Service B,这时候Program D首先访问本机Consul Client提供的HTTP API,本机Client会将请求转发到Consul Server,Consul Server查询到Service B当前的信息返回,最终Program D拿到了Service B的所有部署的IP和端口,然后就可以选择Service B的其中一个部署并向其发起请求了。如果服务发现采用的是DNS方式,则Program D中直接使用Service B的服务发现域名,域名解析请求首先到达本机DNS代理,然后转发到本机Consul Client,本机Client会将请求转发到Consul Server,Consul Server查询到Service B当前的信息返回,最终Program D拿到了Service B的某个部署的IP和端口。
如果不想在每个主机部署Consul Client,还有一个多路注册的方案可供选择
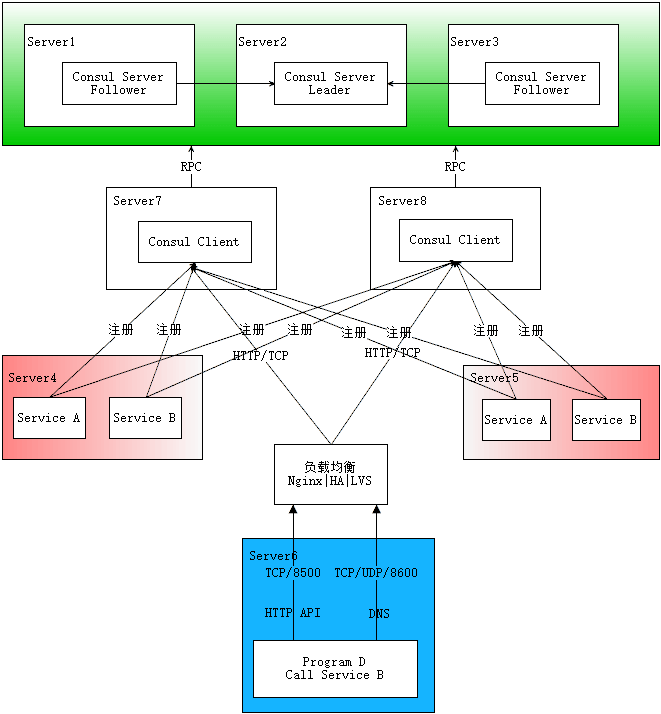
如图所示,在专门的服务器上部署Consul Client,然后每个服务都注册到多个Client,这里为了避免服务单点问题还是每个服务部署多份,需要服务发现时,程序向一个提供负载均衡的程序发起请求,该程序将请求转发到某个Consul Client。这种方案需要注意将Consul的8500端口绑定到私网IP上,默认只有127.0.0.1。
这个架构的优势:
- Consul节点服务器与应用服务器隔离,互相干扰少;
- 不用每台主机都部署Consul,方便Consul的集中管理;
- 某个Consul Client挂掉的情况下,注册到其上的服务仍有机会被访问到;
但也需要注意其缺点:
- 引入更多技术栈:负载均衡的实现,不仅要考虑Consul Client的负载均衡,还要考虑负载均衡本身的单点问题。
- Client的节点数量:单个Client如果注册的服务太多,负载较重,需要有个算法(比如hash一致)合理分配每个Client上的服务数量,以及确定Client的总体数量。
- 服务发现要过滤掉重复的注册,因为注册到了多个节点会认为是多个部署(DNS接口不会有这个问题)。
这个方案其实还可以优化,服务发现使用的负载均衡可以直接代理Server节点,因为相关请求还是会转发到Server节点,不如直接就发到Server。
6. 参考资料
http://blog.didispace.com/consul-service-discovery-exp/